Modern Farmhouse Pine Bench Makeover
I have always wanted to get my grubby mitts on a bench or settle so when this one came along I could't wait to get started!
This blog may contain affiliate links. If you choose to purchase through the link I earn a small amount at no extra cost to yourself. This helps me get paid for creating content like this blog. Thank you for supporting my small business.
Shop the full range of Dixie Belle products here
Product list:
Hampton Olive Silk Mineral Paint
Sand Castle Silk Mineral Paint

Here's the before shot! A great piece but pretty boring orange pine.

This is the water after cleaning it! I used Pristine Clean which is a granulated high performance cleaner which thoroughly removes all grease, grime and dirt build up. The method I use is to decant some Pristine Clean into a bucket with some warm water in. I then use a microfibre cloth to scrub every single inch of the furniture, inside and out including the bottom which can get super dirty! Some pieces require a couple of passes of the cleaning process depending on their age and how dirty they are! Once you've cleaned your piece you then need to rinse with clean, warm water. I allocate a microfibre cloth for cleaning and once for rinsing! The great thing about microfibre cloths is that they can be reused many times which cuts down on waste!

The next step is to scuff sand. This part is really important when using Silk, and one you definitely don't want to skip. Silk Mineral Paint needs slightly more prep work than the regular chalk paint line as with most 'all in one' type paints. By scuff sanding, you create a rough surface or a key which the paint can grip on to. If scuff sanding isn't an option you can use Slick Stick which is Dixie Belle's adhesion primer. This adhesion primer can also be used on surfaces like glass, metal and plastic which paint ordinarily wouldn't be able to grip onto. You can scuff sand by hand with sanding pads - the sanding pads are fab for this - or you can use an electric sander like I am here which is rigged up to my dust extraction unit so that I can sand inside.

I hand sanded the corners and detail where the electric sander cant access with an old sanding sheet from my electric sander. I always try and reuse the sanding sheets where possible as they are fab for reaching nooks and crannies!

Here's the sanded bench! I decided I wanted to keep the tops in a wood finish so I sanded these back all the way to bare wood. Once you have sanded your piece, make sure you remove any loose dust with a clean, dry microfibre cloth.

Next is the fun part! Getting that gorgeous paint on the furniture. I chose Hampton Olive from the Silk Mineral paint range which is made my Dixie Belle. This is a mineral paint with a built in stain blocking primer and built in top coat. To get best results with Silk, apply with a dry synthetic brush - the one I'm using here is the Dixie Belle Mini. Long, smooth strokes work best and don't be tempted to overwork the paint as that will lead to unwanted texture in the paint. Unlike the regular Chalk Mineral Paint, it isn't advised to add water or use a mister bottle with Silk as this can dilute the properties of the paint.

Drying time for Silk is 2 hours (it is touch dry sooner) but it's advised to wait a minimum of 2 hours before re-coating. This is because Silk dries from the top down (forms a skin) so whilst it may feel and look dry, it may not be completely. If you apply your second coat too soon it could disturb the drying paint underneath and cause unwanted texture. You can sand between coats of Silk if you feel its needed but it isn't required.

Now for the sanded back areas. You remember how orange these started out? The above picture is raw pine...better than orange but still a bit ugly. I wanted to lift the tone more to a paler wood colour. Blonde or bleached wood is super trendy and works so well with painted furniture.

I am all for an easy life so I faked the bleached wood look using the colour Sand Castle from the Silk range! I put a tiny amount (remember this paint is super pigmented) of Sand Castle on a paper plate and added some water.
I applied this paint wash over the raw pine with a Dixie Belle synthetic brush - can you see how its acting a bit like a stain? It's leaving the wood grain visible but knocking the orange and brown tones out. Easy peasy lemon squeezie!

Heres the arm faux bleached with Silk paint! I am seriously loving this look. It is worth mentioning that staining raw wood can always be a bit unpredictable so it's worth testing out your staining or bleaching on a small area first to check the result is what you want.

Ok, because I added water to the Silk Paint, I've thinned out the clever properties this paint usually offers - the main one being the built in top coat. I used Extra Coat which is a really tough, water repellant top coat from the Silk range. This means that the stained areas will be protected from everyday use. Silk is a very tough paint so Extra Coat is usually only required for high traffic areas.

The best way I have found to apply Extra Coat is with a Blue Applicator Sponge. I decant some product onto a paper plate, dip the sponge in and work with long, even strokes with the grain of the wood. If you miss a section don't be tempted to pass over that area again as you will create texture in the Extra Coat. It's best to allow it to dry and re-coat and get the area you missed on the second pass. I usually apply 2-3 coats of Extra Coat.
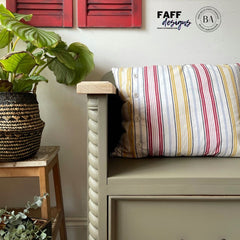
Here's the finished piece staged all pretty! and a couple pf close ups!
Hope you've enjoyed reading the blog!
Con x


3 comments
Absolutely fabulous thank you for sharing this . 🌺
Love this piece and the raw finish look on the top surfaces is beautiful.
Absolutely beautiful!! Love this look. Thank you for sharing this.