How To Paint Wicker Furniture with Chalk Mineral Paint
I have a bit of a thing for retro wicker and bamboo furniture. This pair of sweet bedside tables were already lovely but had peeling varnish and were a bit dull. Read on to find out how I gave them a vibrant makeover. If you'd rather watch the video, scroll down to the bottom of the page!
This blog may contain affiliate links. If you choose to purchase through the link I earn a small amount at no extra cost to yourself. This helps me get paid for creating content like this blog. Thank you for supporting my small business.
Shop the full range of Dixie Belle products here or click on the links below to take you to the specific products I have used.
Product list:
Dixie Belle Oval Small Synthetic Brush
Dixie Belle Mini Angle Synthetic Brush
Here's how the pair of bedsides started out. Really sweet but a bit dull and some flaky varnish - not a good look!

First step is to vacuum the cane or wicker areas. The shelf, the top and the drawer front all got a good hoovering as this can collect dust and 'bits' which aren't always removed when cleaning. I then cleaned as normal with White Lightning cleaner.
Once they were dry, I used a sanding sponge to scuff sand the surface and remove any flaking varnish. I then vacuumed both bedsides again to remove any dust caused from sanding.

Next is painting (the best bit!). I chose Evergreen from Dixie Belle Paint as it's a funky, vivid green (also one of my all time favourite colours). I used an oval brush which was the perfect size for painting the legs and getting into the nooks and crannies.
Water is your friend when painting wicker and cane so I had used my mister bottle to spritz the surface of the piece. I applied very thin coats of Evergreen as you can see from the image. I use less paint than when painting a standard surface so that the paint doesn't pool and drip. I also use slightly more water than usual to help work the paint into the weave of the cane.

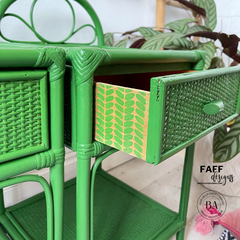
Here is a close up of the cane. The frame of the tables took 2 coats of Evergreen Chalk Mineral Paint and the cane areas (top, shelf and drawer front) took three very thin coats. Cane and wicker can be very porous and soak up more product than usual. If you use too much product at once to try and cover the wicker then you risk the paint pooling so it's always best to build up thin layers.

I used one of my round brushes and some masking tape to create a stencil brush. If you'd like to see how I did this in more detail, you can view a video on my YouTube channel here.
Then I applied Evergreen with the Cozy Sweater stencil for some cute detail on the drawer sides.

I let the paint dry overnight then applied very thin layers of Gloss Clear Coat with the Mini Angle Brush for a lovely, rich shine. The Clear Coat is also best applied in very thin layers to avoid it pooling in the weave of the wicker or cane. I worked in small areas by brushing on a thin layer then going back and working it into the cane using criss cross motions. I applied 3 thin coats of Gloss Clear Coat allowing it to dry thoroughly between coats.
Below are the finished bedsides looking rather snazzy paired with some hot pink accessories. I hope you agree they look great in green and that this blog has helped you with your wicker painting projects,
Con x
P.S Don't forget to check out the video of the transformation at the bottom of the page and subscribe to my YouTube channel!


Leave a comment