Parrot Cabinet Makeover
In this how-to blog, I cover the process of techniques I used to create this funky eclectic cabinet!
*This blog may contain affiliate links. If you choose to purchase through the link I may earn a small amount at no extra cost to yourself. Thank you for supporting my small business.
Product list:
White Spirits
Wire Wool
Antebellum Blue Chalk Mineral Paint

Here's how this old pine cabinet started out. A little bit drab but the bones were good!


The first task was to remove the wax. There is no short cut with this process and its a must before you go anywhere near the piece with paint. Paint doesn't sit on wax - it acts as a resist and as a result you get poor adhesion and often chipping or peeling of the paint will occur. To remove the wax I used white spirits and wire wool. I pour a little white spirits on the area and rub with wire wool to life the wax then wipe clear with a rag or shop cloth. This process needs repeating as many times as necessary until all the wax has been removed. You can tell if there is still wax present by running your nail over the piece. If you get a build up of product under your nail then you still have wax. If your nail is clean then you're good to go to the next step.


Once every last scrap of wax was removed I cleaned twice with White Lightning. Can you believe how different it looks from the very first photo?! Now we're ready for paint!

This piece is made from a combination of solid pine and pine ply. I knew I would be using decoupage on the front two panels and I didn't want to risk the pine bleeding through and effecting the colours of the rice paper so I used White BOSS to prevent this from happening. BOSS is a stain and odour blocking primer and comes in three colours: white, clear and grey. I specifically chose white for this project as I wanted a crisp background to add the rice paper to. This rice paper is slightly transparent so when stuck to a surface, some of what's behind will be seen. By using a white background, this will allow the colours of the rice paper to be vibrant and bright which is exactly the look i was aiming for.
This photo also shows the first coat of Peacock which the rest of the cupboard was painted in.


Once the Peacock base coat was dry (I applied 2 coats for full coverage), the next stage was to add a wash of Antebellum Blue. I used a pot to decant some Antebellum Blue and added some water to create a runny version of the paint. Using the Best Dang Brush, I applied this over the Peacock. Best Dang Brush is amazing for 'speed painting'! It covers large areas so quickly!


Before the Antebellum Blue wash had chance to dry (keep your mister bottle handy to keep it from drying out), I wiped back the majority of the paint with a shop cloth. This technique adds depth and tone to your finish on an otherwise flat colour. Top tip! Work in small areas to prevent the wash from drying out before you have chance to wipe it back.


Now we're ready to decoupage! This rice paper is called 'Birds' for obvious reasons and was picked by my customer for this project. I applied a layer of Gator Hide as my sticking medium then laid the rice paper over. I used a scrunched up ball of cling film or plastic wrap to smooth the paper out and eliminate wrinkles.


I added a coat of Gator Hide over the top of the paper to seal and protect the paper from getting ripped or scuffed. I repeated this making sure I matched the pattern up over the panel. I left the edges to trim once the Gator Hide was dry.

Once the Gator Hide had fully dried I applied a layer of Best Dang Wax in Clear over the entire piece (including the decoupage).
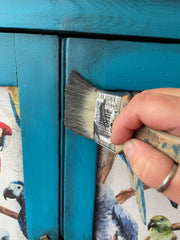

With a premium chip brush, I added some Best Dang Wax in Black over the top. Don't panic if you think it looks a little crazy at this point!! I concentrated around the doors, corners and edges of the cabinet.

I removed some of the black wax with a dish sponge and some clear wax to work as an erasure. This technique leaves some of the black wax in the deeper wood grain and dings and crevices of the cabinet which adds depth and age to the paint finish.

Finally I waxed the top of the cupboard with Best Dang Wax in Clear and the La Petite brush to preserve and protect that gorgeous antique pine top.

Here's the completed cabinet along with a little cheeky chap (my boy!)
I hope this was useful to you but if you'd prefer to watch a video on the process, I created this piece over a series of live videos which I have uploaded to my YouTube channel and you can watch them by clicking here.


Leave a comment